|
Messages
Syllabus
Schedule
Lecture
Lab
Projects
Trip(s)
|

 |
|
|
|
| |
|
|
|
| |
Messages>Labs>Tips>Tip
5 |
|
|
5. |
How to Join two tables |
|
|
| |
Tables are joined on the basis of a primary key – a field in both tables that
share the same values and field type. Field names for the key need not be the
same, but field types must be identical. For example, tables could not be joined
on a key that in one table is the field type “short integer” and in the other
“text”, even if the field values are otherwise identical. In the example below
the primary key is UNIT_ABBREV and LABEL. Both fields are type “text”. To
see the field types of a table in ArcMap, examine the “Fields” tab in layer
Properties. The same can be done in ArcCatalog. Right-click on the table to
access Properties.
If the join will be done on a "text" primary key field, the key attributes in
both tables must not only be "text", but of the same case; the text in one
table's key field can't be upper case and the other lower case (at least for
tables exported from Excel). |
|
|
| |
|
OID
|
GEOMETRY |
UNIT_ABBREV |
1 |
Polygon |
pCvs |
2 |
Polygon |
pClcg |
|
3 |
Polygon |
pCtmg |
|
4 |
Polygon |
pCvs |
|
AGE
|
NAME |
LABEL |
Proterozoic |
Valley Spring Gneiss |
pCvs |
Proterozoic |
Lost Creek Gneiss |
pClcg |
|
Proterozoic |
Town Mountain Granite |
pCtmg |
|
Proterozoic |
Packsaddle Schist |
pCvs |
|
Proterozoic |
Packsaddle Schist Marble |
pCvsm |
|
|
|
| |
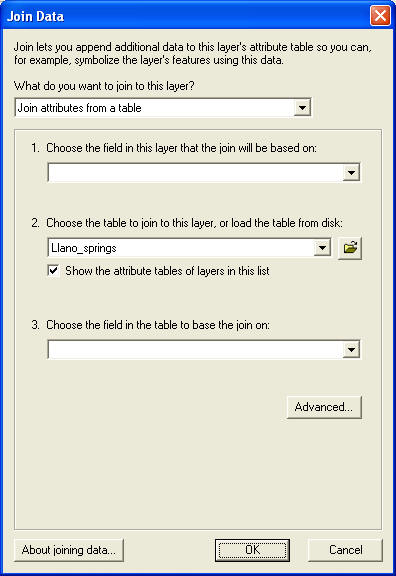
To Join the lower table with upper table in ArcMap, open the Layer Properties
window of the upper table’s layer (in this case a polygon shapefile). Bring up
the “Joins & Relates” tab and click the “Add” button in the Joins half (left
half) of the dialog window to bring up the dialog window shown below: |
|
|
| |
 |
|
|
| |
Fill in the dialog boxes:
- Item 1 requests the primary key. In the example above you
would select from the drop down menu “UNIT_ABBREV”.
- Item 2 requests the name and location of the table to join
to – browse to that table. It need not be loaded in ArcMap, but
it must be a table in dBase or text format; Excel or other
tables must first be converted to one of these formats (see the
tip on doing so).
- Item 3 requests the field to join on. In the example above
it is “LABEL”.
The “Advanced…" button provides an additional options for how to
handle records in the joined table for which there is nothing to
join. Examine the options. The default is usually OK.
The result of a table Join is a modified attribute table for
the layer to which the join is made. The new table shows the
appended fields from the joined table and new field headings that
reflect the join. The table cannot be edited, though the source
tables can be, and is updated as changes to the source tables are
made. The join only exists in a virtual state – no permanent
changes are made to either table – and persists only within the
map document. To establish the relationship more permanently, you
can either store the join as part of the layer’s properties by
creating a Layer file, or you can export the data to a new feature
class or shapefile, which creates a new file with an attribute
table that contains the joined fields. In the example above the
resulting join will look like the table below, with the exception
of the field names, which will also incorporate the table (file)
names.
| OID |
GEOMETRY
|
UNIT_ABBREV |
AGE
|
NAME
|
| 1 |
Polygon |
pCvs |
Proterozoic |
Valley Spring Gneiss |
| 2 |
Polygon |
pClcg |
Proterozoic |
Lost Creek Gneiss |
| 3 |
Polygon |
pCtmg |
Proterozoic |
Town Mountain Granite |
| 4 |
Polygon |
pCvs |
Proterozoic |
Valley Spring Gneiss |
|
|
|
|