|
Objectives:
- To become familiar with the use of an inexpensive hand-held GPS receiver
- To get a physical feel for the accuracy of an individual
measurement
- To learn how to import GPS point data from a text file
into ArcMap
- To learn to extract point coordinates (Eastings, Northings)
from a point shapefile
Exercise:
This exercise entails the following steps:
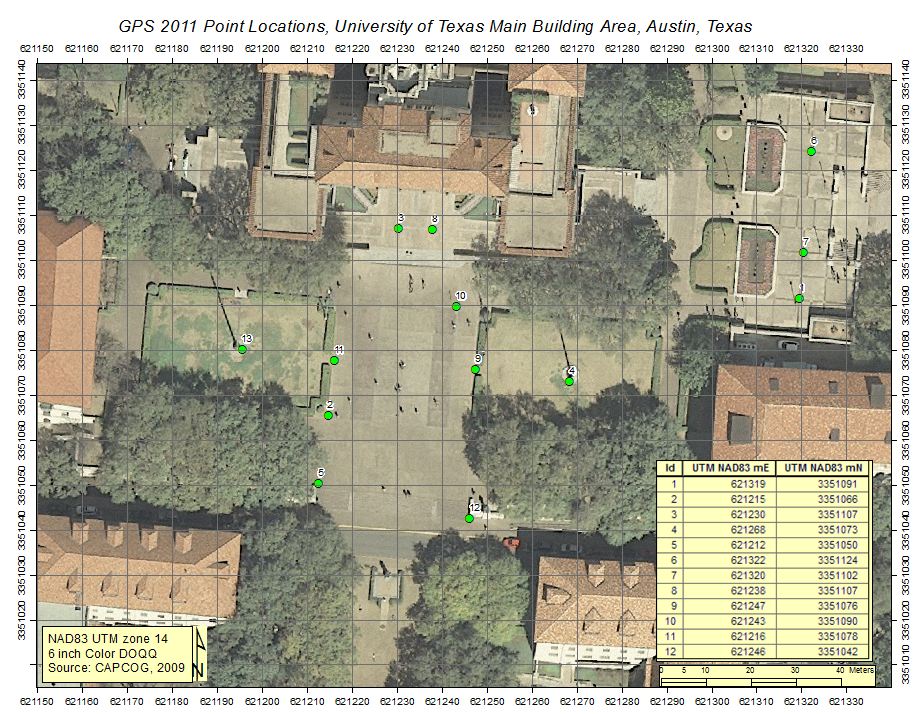
A. Preparing a map for use in the field
1) Copy the Lab_8_data folder to your storage space and then open the
"Main_Building_11" map document in that folder. The
Spatial Reference for the map is NAD83, UTM zone 14N. The
map contains two layers: 1) a 6" resolution DOQQ (note that as with
all DOQs, 6 inch resolution refers to sampling size of the pixels, not
the resolution of the original photograph; this DOQQ was downloaded from
CAPCOG) that covers part of the area around the Main Bldg. of the UT campus and
2) a feature class of 13 GPS target points – points that you will record the
positions of with your GPS receiver. The Data Frame has been fixed to a
scale of 1:800 and the page layout should be “landscape” mode to show
all 13 points. Leave the
map in Layout view.
2) Open the Attribute Table for the Target Points feature class and,
using the "Add New Field..." option (selectable from the "Table Options"
button at the top of the Attribute Table), add a field named
Easting with field properties Field type = Long Integer.
Repeat this process to add a second new field named Northing, Field
Type=Long Integer. These new fields will hold the
Easting and Northing coordinates for the Target Points.
3) Use "Calculate Geometry" function to have the software calculate the Easting and Northing of each target point.
Do so by right-clicking on the field name, selecting "Calculate
Geometry..." and filling in the appropriate information. Note that results from this tool are always reported in
the coordinates of the original data set (i.e. in this case NAD83 UTM zone
14). The TA will show you how to simplify the attribute table before adding
it to the layout - eliminate decimal values, hide columns, etc.
4) Narrow the table field widths to the minimum that will still show
the values, then from the Attribute Table Options button “Add Table to Layout”.
5) Move the added table frame to the lower left corner of the
layout, adjust its size to a minimum, and fill the frame background with
white (right click when the new frame is highlighted to bring up its
Properties, then modify the Background to white). Your completed layout
should look like that below.
6) If not already there, create a 10 meter UTM grid for the layout, like that shown below
in the example.
7) Print the Layout in color for use in collecting your GPS data.
B. Collecting the GPS data
1) Delete all waypoints, tracks and routes from your Garmin GPSmap
60CSx receiver. To delete all tracks, press the "Page" button
until the "Main Menu" screen is visible, use the arrow button to
highlight the "Tracks" icon, press "Enter", use the button to highlight
"Clear", and press the "Enter" button. To delete Waypoints, press the "Find"
button, use the arrow button to highlight the "Waypoints" icon, press
the "Enter" button, press the "Menu" button, use the arrow button to
highlight "Delete...", press "Enter" twice and select and Enter "Yes" to
delete all waypoints.
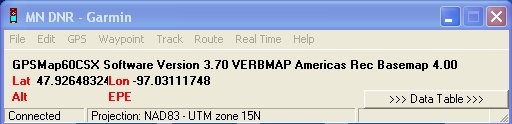
2) Set the Datum and coordinate system to NAD83 and "UTM/UPS",
and turn WAAS on. Use the "Page" button to navigate to the "Main
Menu" page. Use the arrow button to highlight "Setup", press
Enter, use the arrow button to navigate to the "Units" icon, and press
Enter. Set the "Position Format" to "UTM/UPS" by pressing the
"Enter" button to get a drop down list and the "Enter" button again once
UTM/UPS is highlighted on the list. Use the same procedure to set
the "Map Datum" to NAD83. Check to be sure
that WAAS is "enabled" ("Main Menu">"Setup">"System").
3) With your map, GPS receiver and spare batteries in hand, go out and log a waypoint at each
of the 13 target locations by pressing the "Mark" button. You should be able to locate each of these
points fairly precisely simply by carefully examining the photo. They
were chosen using an obvious landmark, e.g. the intersections of sidewalk
tiles,
hedge row breaks, sidewalk edges, flag pole bases, etc. We are interested in the
precision of a single reading and thus want spot measurements, not
time-averaged readings. (These receivers can collect and report an
average using the "Avg" button on the "Mark Waypoint" Screen.) Data collection should
take no more than 30 minutes.
C. Downloading data from the receiver
For a Garmin GPSmap 60CXs receiver:
1) Connect the download cable to the receiver and the USB port of a
computer. Note: A laptop with download software will be
available in the classroom. You will need a USB flash drive to
move your data from the laptop to a desktop computer in the lab.
2) Turn on the receiver.
3) To download waypoints from the Garmin receivers we will use
DNRGarmin 5.4, an excellent freeware program from the Minnesota
Department of Natural Resources. A zipped file containing the
software is located in the class folder in the "Programs" folder.
Excellent help is available in the Help Menu of the program, but nobody
reads help files....
With the receiver on and the cable connected to a computer, do the
following:
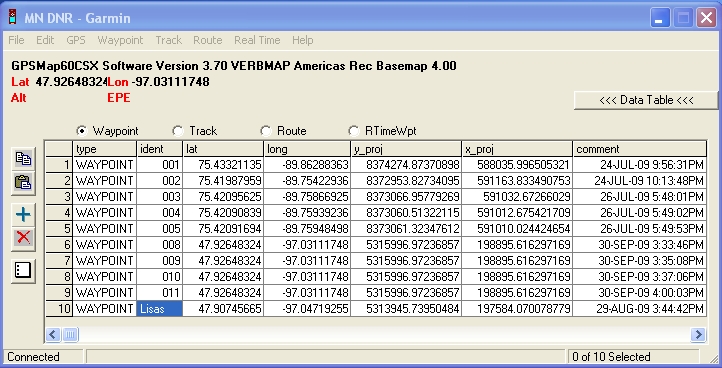
- Start the DNR Garmin software - it will detect the receiver and
present a window like the one shown below. If it does not
detect the receiver, from the "GPS" menu at the top of the window
select "Set Port" and select "USB". In a few moments it will
detect the receiver.
-
From the "Waypoint" menu, select "Waypoint
Properties..." and from the Waypoint tab uncheck the fields that you
don't want to keep, basically all but the required ("type",
"indent", "lat", "lon", "y_proj"," x_proj") and "comment"
fields.
-
While still in the "Waypoint Properties" window, go
to the "Projection" tab, click the ArcMap radio button, click the
"Load PRJ" button and browse to the Projected Coordinate
Systems>UTM>NAD 1983>NAD 1983 UTM Zone 14N prj file. Click Open.
This process loads the ArcMap PRJ file (the projection information)
needed to export the waypoints as a projected shapefile. Note: this
process will only work if ArcMap is installed on the machine that is
being used to download the data. Alternatively, select the
EPSG radio button, set the Datum to NAD83 and choose "No Projection"
in the "Projections:" list. This will allow export of an
unprojected shapefile.
Examine the other tabs if you like but no changes are
needed for this exercise. Close the Properties window.
-
From the "Waypoint" menu, select "Download".
This will download all waypoints from the receiver to the DNR Garmin software and display
them, as shown in an example below.
-
From the "File" menu, select "Save To" >"
File" and then use the "Save as Type" option in the "Save As" window
to specify the file type as "ArcView Shapefile (Projected)(*.shp)".
Give the shapefile a name and location (save it to a
previously created empty folder on your USB flash drive). If
this does not work (usually because the projection information is
not in the right form for ArcMap), then try again, this time
specifying "ArcView Shapefile (Unprojected)(*.shp)".
-
Do this a second time, this time "Save As" a "Text
File (Comma delimited)(*.txt)" using the same file name.
Browse to this file using Windows Explorer and change the new file
name extension from ".txt" to ".csv". If
you cannot see file extensions displayed in Windows Explorer then
see this tip for
exposing them.
-
Exit from the DNRGarmin software.
D. Opening a Waypoint Shapefile in ArcMap
1) Check the spatial reference of the shapefile in ArcCatalog to
ensure it is the same as the one you used to collect the data. If
not, clear it and "Define" the proper spatial reference (see
Lab 2 if you've forgotten how). Unprojected shapefiles created
by DNR Garmin will sometimes not have the proper datum (e.g. NAD83 will
be shown as WGS84 in ArcCatalog). DO NOT IGNORE THIS STEP.
ONE OF THE BIGGEST POTENTIAL SOURCES OF ERROR IS HAVING AN IMPROPERLY
DEFINED SPATIAL REFERENCE. IT MUST AGREE WITH THE COORDINATES
RECORDED IN THE GPS FILE OR IT WILL NOT PLOT PROPERLY IN ARCMAP.
2) Reopen the East Mall map document and add the waypoint shapefile
to it.
3) Symbolize the data, as desired, for comparison with the actual
locations of the readings.
E. Importing a Text file into ArcMap
Comma-delimited text is a very common file format (.csv
extension) that can be created by export from many software
applications, including Excel and many GPS receiver download software
applications. ArcGIS software reads comma delimited text files.
If all else fails, importing tabular GPS data from a CSV file usually
works. CSV files can be created from scratch by entering data in
Excel or any text editor and then brought into ArcMap using one of the
many ArcGIS tools designed to do so. Creating CSV (or DBF) files
from scratch that can be read by ArcMap is the subject of a
software tip. The
CSV file created by DNR Garmin is properly formatted, so will import
nicely without modification. As practice, we will import it.
The process of importing GPS data into a GIS is one of the most common
stumbling blocks encountered by novice users. This is perhaps one
of the easiest way to do it, particular if software that exports GPS
data directly to a shapefile is not available.
-
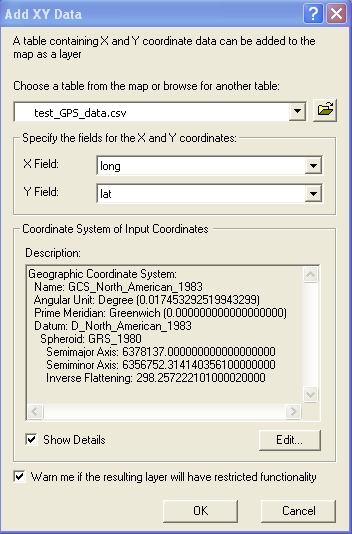
With the East Mall project open in ArcMap, open
the "Files" menu at the top of the screen, select "Add
Data" then "Add XY Data..."
browse to your CSV file and fill in the fields as shown below - note
that you will also need to use the "Edit..." button to change the
Coordinate System to GCS NAD83, as shown below, before clicking
"OK". This important last step, often
neglected, matches the Spatial Reference of the data, as
collected, to the Spatial Reference being created during this
step. Without it, the data will not display where they belong.
- After clicking OK, you will see the message shown
below. An object ID field is the "Key" field in a relational
database and this table does not have one. No worries, one can be
created by saving this data to a shapefile after it has been imported.
The message tells you how to do so.

-
By clicking OK, the data are imported into ArcMap
as "Events". They are not yet a feature class. To make
them so, they need to be exported as a shapefile or as a feature
class to a Geodatabase. Follow the instruction in the warning
message above to create a shapefile from the imported "Events".
|
 |
|
To turn in:
1) A layout that shows the known and measured location of the 13
points, with the DOQ as background.
2) An Excel table that lists the known and measured location of the
points, and the distance (in meters) between known and measured
locations for each point. This will be the square root of the sum of the
squares of the difference in the northings and the difference in
eastings. Let Excel make
the calculation. Data can be exported from ArcMap (in the attribute table
window, click the Option button, then "Export...") and loaded into Excel as
a DBF file.
3) A brief (very brief) summary of your procedure and results, giving
mean, max. and min. differences between measured and known locations, with
any explanation for the differences. No more than a page total!
|
|