|
Goal
GPS data from last weekend's field trip need to be brought into
the GIS project constructed in Lab 8 and assembled into a geologic map that shows
field observations.
Procedure:
The general procedure for lab this week involves the following steps:
- Import field data into the ArcGIS project created last week;
- Clean the field data of spurious GPS point and vertices.
Edit your point file attribute table, if necessary, so that joint/foliation
strikes and dips are correct;
- Merge or Append line, point and polygon files to create single feature classes;
- Edit these lines and polygons to remove any self-overlaps or undershoots;
- Snap the ends of the line segments to create single lines that
entirely enclose areas;
- Convert the enclosing line features to polygons;
- For polygons that lie within polygons, subtract the overlying
polygon from the underlying polygon - this step completes
polygon creation and editing;
- Add these new feature classes (the new lines, polygons, and point shapefiles) to your existing GIS from
Lab 8;
- Symbolize the new data to make a map.
- Hyperlink field photos to locations.
9.1 Getting Started - Importing Field Data
- Open the Collector App on the iPad and sync with ArcGIS Online.
Do this even if you did so on Sunday before leaving the WMA.
- On a desktop computer, open the Lab 8 ArcMap document that
you used to create your non-editable Base Layer Feature
Layer in ArcGIS Online. Turn off the "All points thru 2015" layer.
- Copy the Lab_9_data folder to your local storage space.
For convenience, this should be the same place you stored the
Lab_8_data folder. Unzip the
"MH_MMWMA_EditLayers_2016_Export3-28-16" folder into this folder
using a right-click>Extract. Be sure you know the
destination of the unzipped folder. This zipped folder
contains a file geodatabase of all of the lines, points and
polygons collected by students using Dr. Helper's editable
Feature Layer, as well as his attachments (i.e. field photos)
associated with points. Unfortunately, it does not seem to
contain photos taken by others users of this Feature Layer.
- Rename the geodatabase extracted
above with a shorter name that contains your initials. Do
this in ArcCatalog. Add the layers in this geodatabase
your ArcMap from Step 2.
- Open a Web browser and sign into ArcGIS Online.
- If you successfully created a Feature Layer that you
edited in the field, go to "My Content", find your editable
features, click the down arrow and select "View Item Details".
Near the top right of the page, use the down arrow next to
"Export" to select "Export to FGDB". Fill in fields as
requested, then click Export. This will create a new File
Geodatabase (akin to a Personal Geodatabase) that will be
created and stored within ArcGIS Online in your "My Content"
area, with the name you assigned upon Export, with the "Type"
listed as File Geodatabase. These can then be downloaded
(use the down arrow next to "File Geodatabase") and added to
your Lab_9_data folder and unzipped, as in Step 3. This is
my preferred method of downloading and adding field data to an
existing desktop ArcMap (it will preserve attachments, e.g.
photos, whereas the methods given below may not) but is only
available if you created the editable layer and can thus see it
in the "My Content" area of ArcGIS online.
Ignore this
step if you used Dr. H's editable feature layer - you already
have the files you need from Step 3.
- We will next download data from all other iPads.
The general process is:
- In ArcGIS Online, go to "Groups", click on
click on the down arrow next to "Open" (below
the empty thumbnail) for a for one of your
classmate's editable layer, then choose "Open in ArcGIS Desktop". This will create a
downloaded layer (item.pitem) in your browser
which you can save or open, in either case by
double clicking the file.
- Double-clicking will open the features layer
(which contains point, line, polygon feature
classes) in ArcMap and add them to the ArcMap
table of contents (TOC).
- Do Step 7 for all the editable layers in the
Group that contain field data that you have not already
downloaded (i.e. Dr. Helper's and possibly your own).
The editable layers in the Group that contain field data for you
to download, as
indicated by author, are by: xxxxx
- At this point you should see everyone's point,
line and polygon features in the TOC of your ArcMap
document. Read on....
9.2 Converting ArcGIS Online Data For Use Offline
The layers you downloaded in Step 8 above are not permanently resident as part of your ArcMap document, they are still being hosted online and not locally.
The steps below describe a process to create local copies of the
online-hosted Group layers downloaded in Step 8 by importing them into
the file geodatabase copied during Step 3. To
make and preserve a local copy:
- Find the tool within Toolbox (from within ArcMap) "Feature
Class to Geodatabase (multiple)" and open it. From the drop down arrow
next to 'Import Features" select each of the feature
classes (point,
line and polygons) THAT WERE BROUGHT IN DURING
STEP 8 as Input. The "Output Geodatabase" will
be the one in your Lab_9_data folder that you renamed during
Step 4 above.
- Delete from ArcMap any files that might have gotten loaded during
this step that aren't the imported editable field layers, i.e.
you should see only new point, line and polygon files with
student initials at
the end of the layer name. Not sure why this sometimes happens but
best to keep a clean TOC...
- Remove from the Table of Contents the layers that were added
in 9.1 steps 2 and 3 - these are the
online-hosted layers for which you now have local copies. This
will leave only the "local" copies - those hosted on your
permanent local storage - in your ArcMap, plus the original base
layers.
- Save your ArcMap document with a meaningful name.
For possible future reference, another way to create local copies is:
1) within the ArcMap TOC, right-click on the online-hosted editable
layer of interest, 2) select "Edit Features" and create a local copy, 3)
do this a second time and select "Disconnect Local Copy from Server".
Doing this for a few feature classes seems reasonable; for 9 or 12 it
would be onerous. Either way, you now have stand-alone versions of
the Editable Layers installed from the "Group" area of ArcGIS Online
that are available for use by all of the tools in ArcToolbox.
9.3 Downloading and Converting Point Data From PDFMaps
To Download PDFMaps data from your iPad:
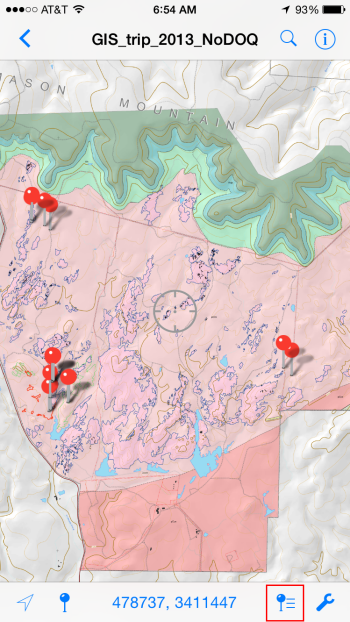
- With the map containing your points open in PDF Maps, select the "Map Features" icon, shown
below at left in a red square, then choose the "Export" icon at the bottom, shown below at right
with the red square.
-
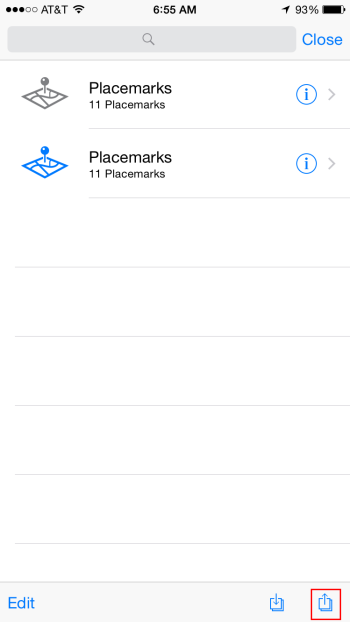
In the "Export
Settings" window (shown below), enter the FileName "WMA_KML_XX" where XX is
your initials, choose "KML" as the Format, a destination, either your DropBox (faster) or an Email attachment
(slower), and set the "Media" option to export photos if desired. This will create
and export a Keyhole Markup Language (KML) file that can be imported into ArcMap or
Google Earth. With more than one Placemark, Line or Track (and photos, if you choose, at least in the iOS
version), a zipped KML file(a "KMZ" file) will be created, which is also readable
by both programs. FYI, GPX and CSV, the other export formats listed, are common exchange format for GPS data,
though neither will export photos with the points. We will not use them, but such files can be imported by many programs and
Apps, including ArcMap. Finally, if you choose to, you have some control over which data are exported by
selecting from "All Features", "Custom" and "Schema
Only" from the Data field.
Regardless of which options you choose, data will be exported with GCS WGS84
coordinates, the spatial reference for all KML.
- Within ArcCatalog, create a folder in your Lab_9_data folder named "WMA_PDFMaps_data_XX", where XX is your initials. Retrieve this newly created KMZ file
from your DropBox or email, and copy it to this folder.
- Copy your field digital photos from your iPad or phone to the
same folder - either email them to yourself (slow) or DropBox them (faster). Do this even if you
exported them within a KML file in the above step.
- Use the Search tool in ArcMap to find the ArcToolbox tool "From KML". The "KML
to Layer" tool will convert KML points and/or lines and attributes (but not, unfortunately photos nor, oddly, the "Description"
data) to geodatabase feature classes within a newly created geodatabase and adds them to your ArcMap table of contents.

9.4 Combining Field Data Into Single Feature Classes
From this point there are many ways forward for creating a finished
map. I have previously found it useful to combine all of the field
data of a single type (point, line or polygon) from different field data
collection units into single feature classes before performing edits.
This can instead be done after editing (or not at all), but requires
editing multiple feature classes of a single type instead of just one.
There can be problems in combining feature classes from different
data collection units. First, if attribute table field definitions are
not standardized it can be difficult to Append or Merge feature classes.
This problem could be avoided If everyone used the same editable Feature Layer
from ArcGIS Online in the field, but this wouldn't give you the valuable
experience of creating and using your own! This is also a problem
when combining data from two different Apps, like PDFMaps and Collector. Second, Merging and
Appending feature classes runs the very real risk of losing feature
class attachments - photos taken in the field with Collector are no
longer attached to points where they were collected and might be
entirely lost if they weren't downloaded to the field unit during
collection.
Because most(?) of you could not collect attachments in the Collector App,
this is not much of a concern. The bottom line for this lab is that if
you can't get the steps below for combining feature classes from
different iPads and PDF maps to work well, or if you are concerned about loosing
attachments, then proceed by editing individual feature classes using
the techniques in section 9.5.
- To create single point, line and
polygon feature classes from the data collected on all of the
iPads we will use the Merge tool. Before doing so, if
you want to keep track of your data, create a new text field in
your point, line and polygon attribute tables and use the field
calculator to enter your initials for each record that's your
own. Ask Nathan how to do this if you need help.
- Using the Merge tool, merge first the point, then the line
and finally the polygon feature classes into single point, line
and polygon feature classes.
- Remove the original non-merged feature
classes from ArcMap. You should now have only 3 field data
feature classes, one point, one line and one polygon feature
class, each containing all of the field data of each geometry
type.
9.5 Cleaning Collector App Data By Editing
Field data are rarely perfect; to fix errors we edit.
Polygon collected while streaming may have contained spurious
vetices that resulted in splitting a polygon into two or more pieces
when "submitting" during capture. Point data may contain invalid
strike or dip values, lines may need to be turned into polygons or
adjusted in position, etc. Furthermore, data collected on multiple
units needs to be evaluated and duplications removed. The
orthophoto, added to your map at this stage, may help. We begin
with polygons. Don't forget to turn on or off layers for selection if
you have trouble selecting what you want to edit. You are, of
course, familiar with the editing process from Labs 4 and 5. Below
are a few additional pointers and a list of items to complete:
- To delete a polygon, start editing the appropriate feature
class, select the polygon (using any of the selection tools
available, including the attribute table) or its row in the
attribute table and press the keyboard Del key, or right-click
in the polygon and choose delete.
- To edit polygon vertices, start editing, select the polygon,
right-click on it and "edit vertices". Move, delete or
insert a vertices as needed.
- To combine overlapping polygons, select them during an
editing session, then use the drop-down menu on the Edit toolbar
and "Merge".
- To subtract two overlapping polygons, do the same but choose
"Clip". If you use the Clip option, be sure that all
base map polygon layers are first turned off in the TOC.
Clipping will clip a hole in any polygon layer beneath the
selected polygon (like, for example, the WMA boundary polygon)
that is turned on in the TOC.
- The "Split Polygon" tool on the Editor toolbar can create
two polygons from a single one.
- To convert closed lines into polygons, first edit them to
ensure that the starting and ending nodes of the lines are
snapped together, then use the ArcToolbox tool "Feature to
Polygon". This tool will fail if the closed lines are not truly
closed by snapping. This tool also requires that the lines
being converted are within the same feature class - you may have
to Append or Merge separate field unit line feature classes
first.
- Once the polygon layer(s) are free of duplicates and
error-free, they can be combined into a single feature class, if
not already done, using the Merge or Append tool, as described
above. Add this new layer to the map if not already there.
- Finally, we are now ready to update "Outcrops thru 2015" feature class.
To do so, we would like to subtract (cut donut holes in) the
existing outcrops where grassy area polygons were collected AND
add the new granite outcrops to the existing file. There are a
number of ways to do this but we will use the following four
steps:
- Extract the grassy area
polygons from the cleaned, merged polygon file
created in Step 7 to a new feature class.
Do this by selecting the grassy area polygons
then, with a right-click on the layer in the
TOC, Data>Export Data... to a new feature class,
"Grassy Areas", in your Lab_9_data geodatabase
and add it to the map.
- Edit your cleaned, merged
polygon file to delete the grassy area polygons.
Save Edits. Stop Editing.
- Find the Erase tool in
ArcToolbox and use the new Grassy Areas feature
class to "erase" granite from the
"outcrops_thru_2015" feature class. Save
your result as
"Outcrops_thru_Spring2015_NoGrass" in your
geodatabase.
- Merge your Outcrops_thru_Spring_2016 and
cleaned, merged and edited polygon file using
the Merge tool in ArcToolbox. This will
create a new file containing all granite outcrop
polygons. Name it "Outcrops_thru_Spr_2016"
and save it in your geodatabase.
It's time for points...
- Imported point files from PDF Maps,
alas, do not have attribute tables that match our
Collector App point layers. They can
nevertheless be Merged together to make a single
feature class - do so using
the Merge tool.
- Edit the attribute table of this merged file to enter
Joint and Foliation strikes and dips that are in the
original PDFMap on the iPad into the empty strike and dip
fields in the attribute table. You will only be able
to do this for your iPad data - we will not share all unit's
PDFMaps data. For future reference, keep in mind that
importing KMZ data using the "KML to Layer" tool does not
preserve the "Description" information (such as strikes and
dips you may have pecked in...) in PDFMaps, nor does it
import photos attached to points.
- Similarly, enter the PT_TYPE for these same records.
Without this information we can't symbolize the points.
- Continue editing... remove duplicate measurements, check
that strikes and dips have reasonable values (a strike of
zero is probably an error), make sure all points have a
PT_type entry (enter one or else delete them).
- You will likely find it easiest if the data are
symbolized. Use the new layer file in the Lab_9_data folder
to do this quickly. To apply the layer file, open the
Symbology tab from the Layer Properties window, click
"Import" and accept the defaults.
- Save Edits, Stop Editing.
Finally, the lines...
- Not much to do here, probably only
removing duplicates. See the polygon section for
editing instructions.
9.6 Hyperlinking Field Photographs to Field Sites
Read the section "Setting HTML pop-up properties for feature layers"
in ArcGIS Help and create HTML pop-up displays for 3 or more
field photographs of your choosing. These will be set up as
"attachments" on the point feature class (see ArcGIS Help for how to
create and enable attachments). You choose how best to organize
the data! An alternative but less attractive way to do this is to
enable the hyperlink tool using a dynamic hyperlink for each point
feature. Search ArcGIS Help for "Using Hyperlinks", paying
particular attention to the section on "Defining dynamic hyperlinks
though Identify Results". The preferred method for
establishing and viewing hyperlinks is:
-
Rename your photos with meaningful file names so that you can easily
know what they show.
-
We will link photos to the field station points by adding them as
"Attachments" to the points. To add attachments, we first need to
"enable" the point feature class so it can contain attachments. Follow
the two steps in ArcGIS Help "Enabling attachments" to do so.
-
Using the instructions in ArcGIS Help "Adding attachments to
feature", attach your photographs to the points where they belong.
-
Once attached, there are number of ways to view the photos, including
using the Identify tool and the attribute table. Read about these in
ArcGIS Help "Viewing attachments".
-
Neither of these viewing techniques is very elegant - the picture
viewing window often covers the map. We will instead set up HTML
pop-up windows for viewing the photos and attribute information.
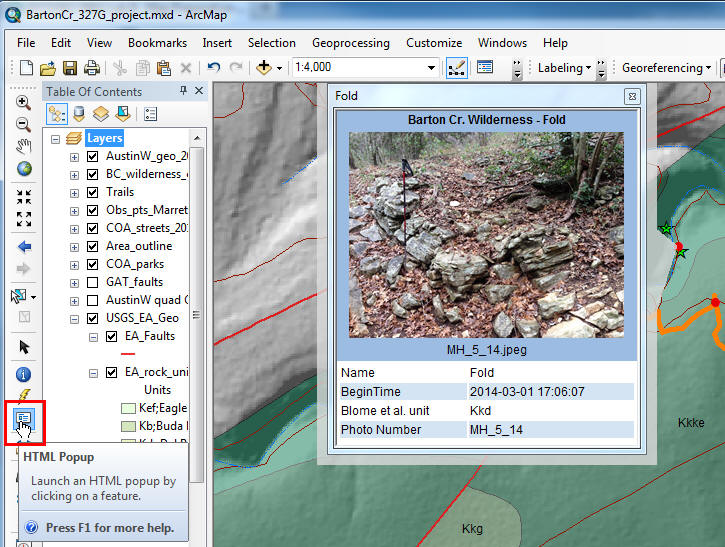
Read ArcGIS Help "Setting HTML pop-up properties for feature layers".
We will use the first option mentioned, "As a table of visible fields"
that "Include(s) feature class attachments". Read
carefully these sections and create your pop-ups. It's a lot simpler than it
looks and you'll be pleased with the result. An example is shown
below; Popups are launched using the HTML Popup tool on the Main
Toolbar, highlighted in red below.
9.7 Create a new map
-
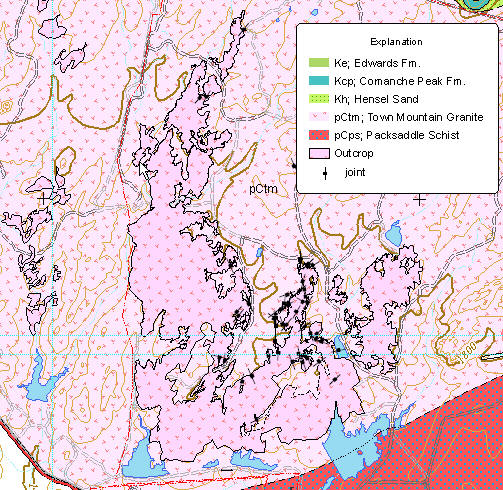
Create two page-size layout of the Saturday and
Sunday field trip areas containing the new map elements - granite
outcrops, dikes and measured point features. A poor example
(e.g. joints illegible, Explanation contains units not on map,
contours below outcrops, no
LIDAR hillshade!) from
a previous trip is shown below. Use the rock unit and outcrop
symbology from Lab 8. Show dikes as thin red lines.
To Turn In:
The layout
described in step 8.5 above, AND a screen capture, like that above, that shows a
photograph attachment open in ArcMap.
You're Done!
|
 |